Ripping an AO Out of a Normal Map
Return to Main | GIMP index
So, let's say you want to convert some
legacy material to PBR. You got a normal map, but you got nothing
that looks like shadows you could exploit to make an AO map. Well,
fret no more, you can generate a quick and dirty AO from a normal
map. It's not going to be perfect, but it's going to be good
enough for most purposes.
I won't get into the full nuts and bolts of
how a normal map works. But what I can tell you is the blue
channel of a normal map describes how directly a pixel is looking at the
the viewer, we can exploit this because pixels angled away from the
camera got steep slopes which don't catch direct light as well, such as
ambient light.
So open your normal map in gimp.
Click Colors->Components->Decompose
Now either hide your red and green layers
so you can see your blue layer. I prefer to right click each layer
and select delete though, since red and green are effectively junk.
Once you have that done you are almost
there. The one catch with a a blue apha-channel is it cannot go
lower then mid-tone grey. So we need to use the curves tool to fix
that.
Click Colors->Curves.
A floater will pop up for curves. Now
this window lets you distort the way things go from light to dark.
We are going to change the definition of what black is so that anything
that is mid-tone gray or darker becomes black.
See that diagonal line accross the
grid? Click that lower-left dot and drag it to the right so it
looks like this:
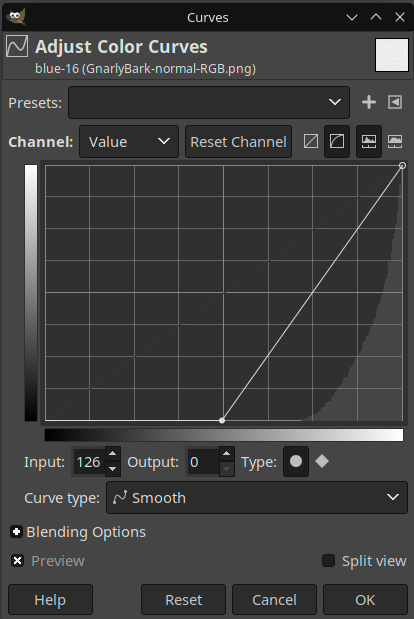
Now click ok. This should get you
close enough for use as an AO map for your metal-rough map. If you
are really fussy you might notice the very bottom of valleys and pits
will be white in the places where the pixels are facing straight up
where in a proper AO map these deep down crevices would be dark.
Using a paintbrush or pencil tool to pain in darkness manually can be
done to touch this stuff up. But if you ignore it and just roll
with what you got most people won't notice.
Either way MISSION ACCOMPLISHED!
